


let them eat cake!
Sometimes, when you’re charged with bringing a dessert to a party—a frequent request in the holiday season, especially—you just don’t have the energy to bake layers upon layers, frost everything, etc. etc., despite your desire to impress everyone with your baking prowess. Sometimes you want to make a tried and true recipe, but you still want to knock their socks off with the look of the cake.
These cakes are for you! I provide you with recipes for two simple cakes, and homemade pdfs for you to download and cut out. Get ready to wow them all.
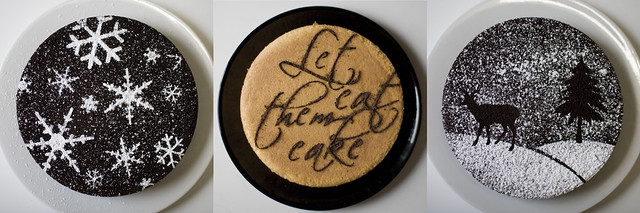
Instead of frosting a layer cake, cut a stencil out of paper (I provide you with pdfs below), and just sprinkle some powdered sugar or cocoa over. You’ll get plenty of ooohs and ahhhs, and more than one person will tell you you’re pretty insane. But if I’m telling the truth, well, those kinds of comments are exactly why I did it!
Cutting the Stencils
Now, fair warning: Cutting the stencils out does take time. But the time to cut it out can be spent sitting in at your coffee table, with the TV on, instead of standing in a hot kitchen. And you can do it well in advance. The easiest of these (the reindeer) took me about 20 minutes to cut, but the most intricate (the snowflakes) took me more than an hour of cutting. A few tips for cutting the stencils, if you don’t have this nifty machine:
- Do NOT cut out the 8-inch circle. You want the overhang to give you something to pick it up by.
- Use a fresh new blade in your X-Acto! These stencils are fairly intricate, and you don’t want the paper to tear. You want it to cut.
- Identify the parts that are waste, and cut dragging toward those areas, instead of vice versa.
- Cut areas that hang outside the 8-inch circle fully, to account for any difference in size and placement of the stencil.
- Be patient. Don’t rush.
- If you have the time, it’s a good idea to press the cut stencil between two books overnight to ensure that the edges don’t curl up too much.
Download the pdfs here. I’ve even included a bonus one that I didn’t dust yet. :) Use Adobe Reader to open them and print them out. Note that they are all sized for an 8-inch round cake.


Baking the Cakes
I have two cake choices for you, but I encourage you to make whatever you want. The almond torte is a family favorite that never fails to please party-goers. The chocolate cake is straightforward but moist and tasty.
Almond Torte
1/2 cup almond paste (not marzipan)
2/3 cup sugar
2/3 cup butter (that’s 10 2/3 tablespoons. It’s weird, I know.)
3 eggs
1/2 teaspoon baking powder
1/2 teaspoon almond extract (use vanilla if you don’t have almond)
2/3 cup flour
Apricot preserves (if desired)
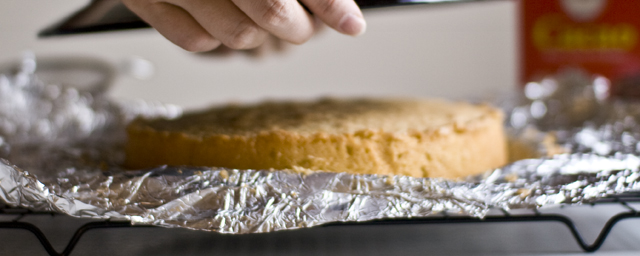
Preheat the oven to 300°F. Line an 8-inch cake pan with foil. Butter the foil. Combine the almond paste and sugar in the food processor and pulse til grainy. Add the remaining ingredients and process until combined. Pour into the prepared pan, spread even, and bake for 50–55 minutes, or until a tester comes out clean. Remove the cake from the pan by the foil, and transfer to a cooling rack. Flip it for a prettier, flatter surface. If desired, slice in half and spread a layer of apricot preserves across the bottom half, then place the top half back on. If you’re feeling lazier, serve the preserves on the side as an accompaniment. Or leave it off all together; it’s tasty without it, too.
Chocolate Cake
Adapted from Barefoot Contessa
3/4 cup plus 2 tablespoons all-purpose flour
3/4 cup sugar
1/2 cup Dutch-processed cocoa powder
1 teaspoon baking soda
1/2 teaspoon baking powder
1/2 teaspoon kosher salt
1/2 cup buttermilk
1/4 cup vegetable oil
1 extra large egg, room temperature (I used 1 large and most of 1 medium egg)
1/2 teaspoon pure vanilla extract
1/2 cup freshly brewed hot coffee
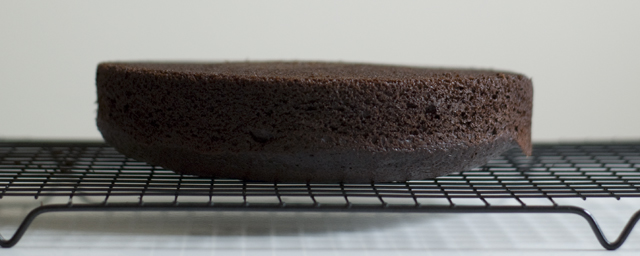
Preheat oven to 350°F. Butter and flour an 8-inch cake pan. Sift together flour, sugar, cocoa powder, baking soda, baking powder, and salt. In the bowl of an electric mixer fitted with the paddle attachment, combine the buttermilk, oil, egg, and vanilla. With the mixer on low, slowly add the dry ingredients to the wet to combine. Stir in the hot coffee (if the mixer is on, it’ll splash on you. Ask me how I know.) just until combined—it will be very liquid, but don’t worry. Pour into the prepared pan and bake for 35–40 minutes or until a tester comes out clean. Let sit in the pan for about 10 minutes, then flip out onto a cooling rack so the bottom is on top, for a more pretty surface.
Let the cake cool a bit. If you’re using confectioners’ sugar, let it cool for at least 30 minutes—the sugar will melt if it’s put on a hot cake, but you want the cake’s surface to still be a bit tacky, so it will stick. If you’re using cocoa or cinnamon, you can decorate almost immediately, and in fact a little heat to get it to melt and stick is a good thing.
Dusting the Cakes
Prepare the powder first: Place about 1/4 cup of your chosen powder in a strainer or sifter, and sift it onto a piece of wax paper. Discard any clumps that won’t work themselves out. Set aside.
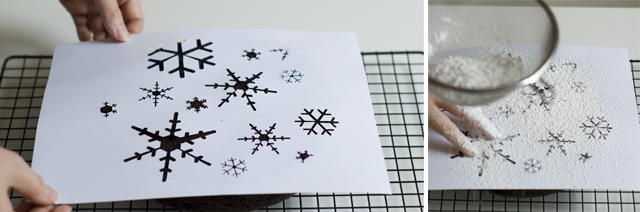
Place the stencil down, aligning the edges of the circle to the edges of the cake as best you can. Here I flipped the snowflake stencil over, but you don’t have to. Press it against the cake so that it sticks to the surface. Transfer the sifted powder back to the strainer, and tap it or shake it gently above the cake until all areas are covered. If the paper is curling up, just hold it down as you tap; eventually all areas will get covered, and you definitely don’t want the powder to get under the stencil. You can go as thin or thick as you want; I admit I like a nice thick shape so that it has some presence. But that is more risky to preserve in transport. When you’ve covered it to your satisfaction, let it sit for a moment as you take a deep breath.
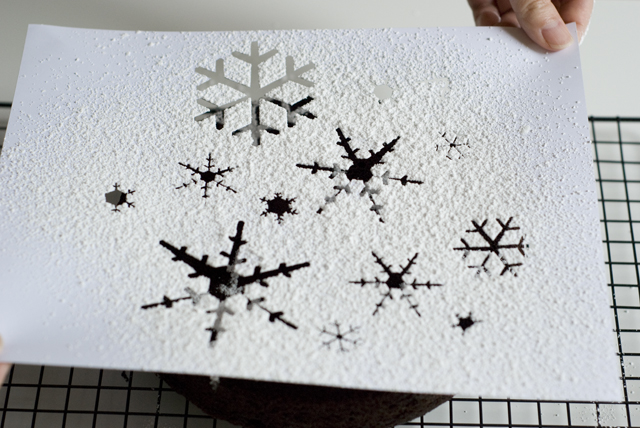
Grasp the edges of the paper, and in one fluid motion, pick the paper up, keeping it as flat as possible, and move it as far away as you can before dropping it. It can go right in the trash, the sink, or back onto the wax paper. Don’t worry if small bits of powder tumble onto the cake—a little is no big deal—but, of course, the aim is to have little to no drifting. Some areas benefit from being picked up carefully with a pair of clean tweezers, like the tree and deer, and even the big swoop in the “h” of “them.” Otherwise you risk messing up the rest of the design—or, in the case of the “h,” the weight of the powder on the shape will cause it to fall and drop all the powder back onto the cake.
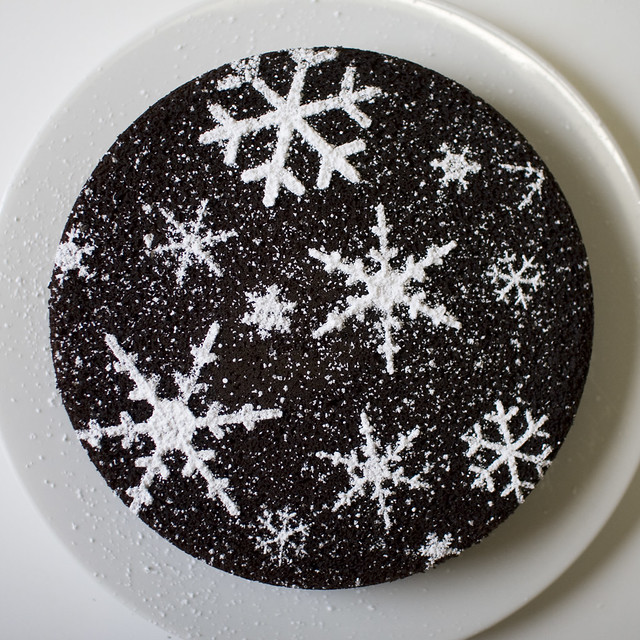
The snowflake cake seemed to want a little extra dusting of snow—just a touch so that the true flakes were preserved. It’s easy to go too far, so take it slow and steady, and tap LIGHTLY. You can always add more, but you can’t take any away.
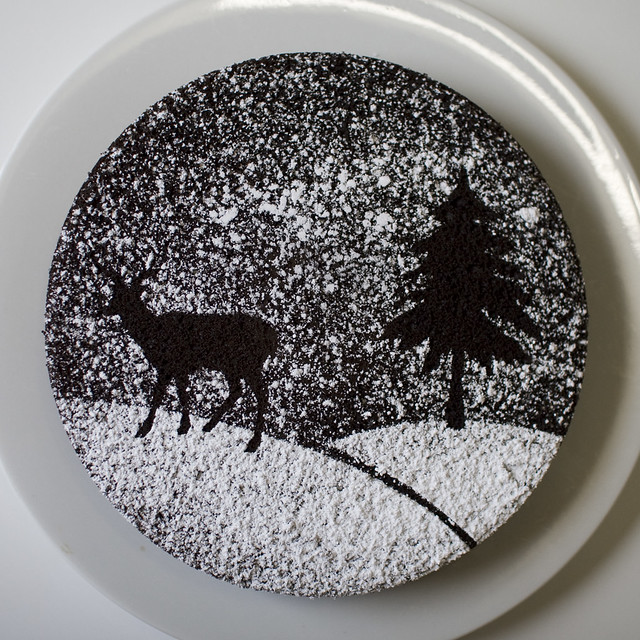
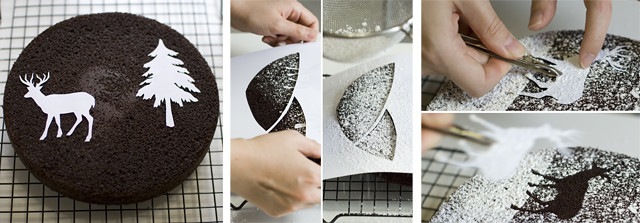
The reindeer and tree were done in steps, which I’ve shown above. Two copies of the template need to be printed, and from one you’ll cut the deer and the tree—they are the shapes you place on the cake first—and from the other you’ll cut out only the ground (don’t cut around the deer’s legs or the tree trunk). Place the deer and tree down where you want them, low enough that they will be on the “hill” in the final image. Dust the sky with enough snow to make the outline of the shapes visible. Then carefully lay the second stencil on top, and fill in the snowy ground with a dense coating. (Actually, in retrospect, you ought to place all the stencils down first, dust the ground heavily, then lift up the big piece and then gently dust the sky. Otherwise you could mess up the sky when you place the big stencil on top.) As you can see, I used (clean!) tweezers to pick up the deer and the tree.
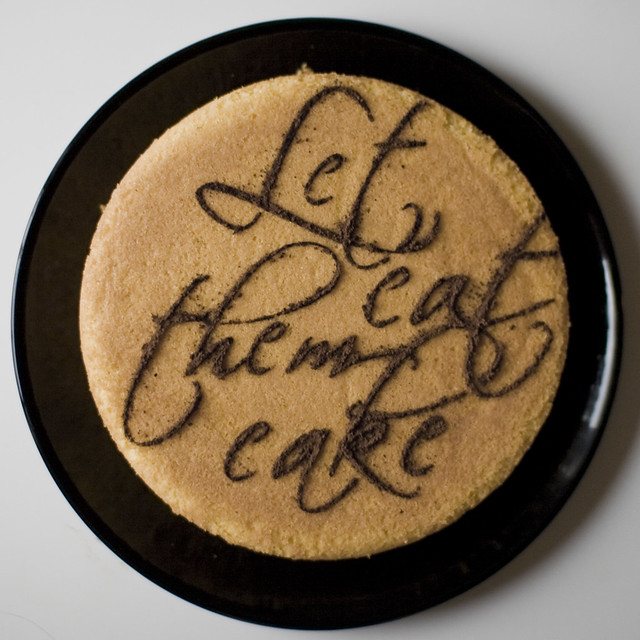
“Let them eat cake” was straightforward when it came to dusting, but lifting it was far more tricky, because there are more parts to sag and move. I actually cut the swoop of the “h” out and placed it down separately, then lifted it with tweezers so that it wouldn’t spill. I used cocoa on the almond cake, mostly for color. I think cinnamon would be tasty too. I will say that cutting this one was definitely the hardest and required the most patience. (The snowflakes required the most time.)
There you go! Step back and marvel at the beauty you’ve just created.
32 Responses to let them eat cake!
gorgeous as usual! you have a knack for these things :)
If I get a food processor for Christmas that almond torte is the first thing I’m making. I want it so very much whenever you mention it.
You are a mad genius. LOVE THEM ALL.
you totally are insane, but I mean that in the best way possible.
Lovely! I love the raindeer and tree the best, I think the three different levels of coverage are very impressive (even if simple to accomplish).
if I don’t make all of these immediately I will just DIE.
Minty, these are just fantastic!
Minty! These look STUNNING. Gorgeous gorgeous gorgeous.
absolutely gorgeous. I really like the raindeer and the tree.
Fabulous! Love them all.
these look AMAZING!!!
Brilliant! I’m going to have to try this soon!
I don’t know if I have the patience for this, but I think I could handle a Christmas tree on a hill stencil! So pretty!
I don’t have words good enough for the cuteness in front of me! LOVE!
beautiful! i can’t wait to try this…
BRILLIANT.
this is so at the top of my list if i need to make anything remotely Christmassy this year. love it.
This is amazing!! thanks so much for the directions and pdfs, I’ve always wanted to do this but have totally failed in the past. and the recipes look amazing, too!
The cake is a lie. Hee!
This is so, so awesome. Thanks for sharing the templates!
I love that it is beautiful AND healthy (no sugary rich frosting).
Do you think you could also cut these out of thin plastic sheets, like the kind you can use to cut out quilting stencils? Maybe that way you can re-use it and not have to get the X-acto out every time. I bet the plastic can be easily wiped clean.
Vivren: A plastic template is a GENIUS idea! I would definitely do that next time.
Absolutely beautiful! Thanks for sharing these.
I am in love. I’m borrowing this idea for cookies! :)
What a beautiful way to decorate a delicious cake. Thanks for providing the pdf files!
These look amazing! Thank you very very much for the step-by-step photo process! It’s a lot easier for me to see it done rather than read about it! Great job on the dusting and I’m sure those cakes tasted great too :-)
Also, commenting about the plastic idea instead of paper. I love that idea! That way the plastic might be strong enough to hold up the sagging areas too.
This is incredible! I adore the snowflake one. I love how the snowflakes fall off the side of the cake. Beautiful!
Very cute idea. I have a bunch of stencils for doing this, but I have never done it before. Definitely going to give it a try. I am your newest follower.
xo
your bonus stencil is AWESOME!!!!!!!!
Ridiculously pretty! I love cakes stenciled with powdered sugar. I haven’t picked a dessert yet for Christmas, maybe I can make this happen. I’m just such a klutz…
Awesome!
I tried it out and thought the stencil took a while to cut out, it was definitely worth the time and effort! I posted a picture of it on Flickr… Check it out!
http://www.flickr.com/photos/tottphotography/5332646184/lightbox/
Hi Minty! You inspired me to make a Chinese New Year stencil!
http://vivren.wordpress.com/2011/01/31/year-of-the-rabbit/
Thank you!
Thanks for the inspiration! Made steampunk cakes with stenciled gears on a lemon-pound cake, chocolate cake (using the same awesome Barefoot Contessa recipe), and red velvet cake. They came out great!! Lots of compliments
A warning to those trying this for the first time: on richer cakes (like the chocolate and red velvet), the sugar gradually melts into the cake, so if you do the stenciling the night before (as I did), be prepared to touch up the sugar with a fresh coat (which is challenging!) — or, better yet, just wait to do the stenciling until the same day you plan to serve the cakes. On the lemon-pound cake, which is a bit drier, it all stayed fresh looking, even overnight.
Thanks again!