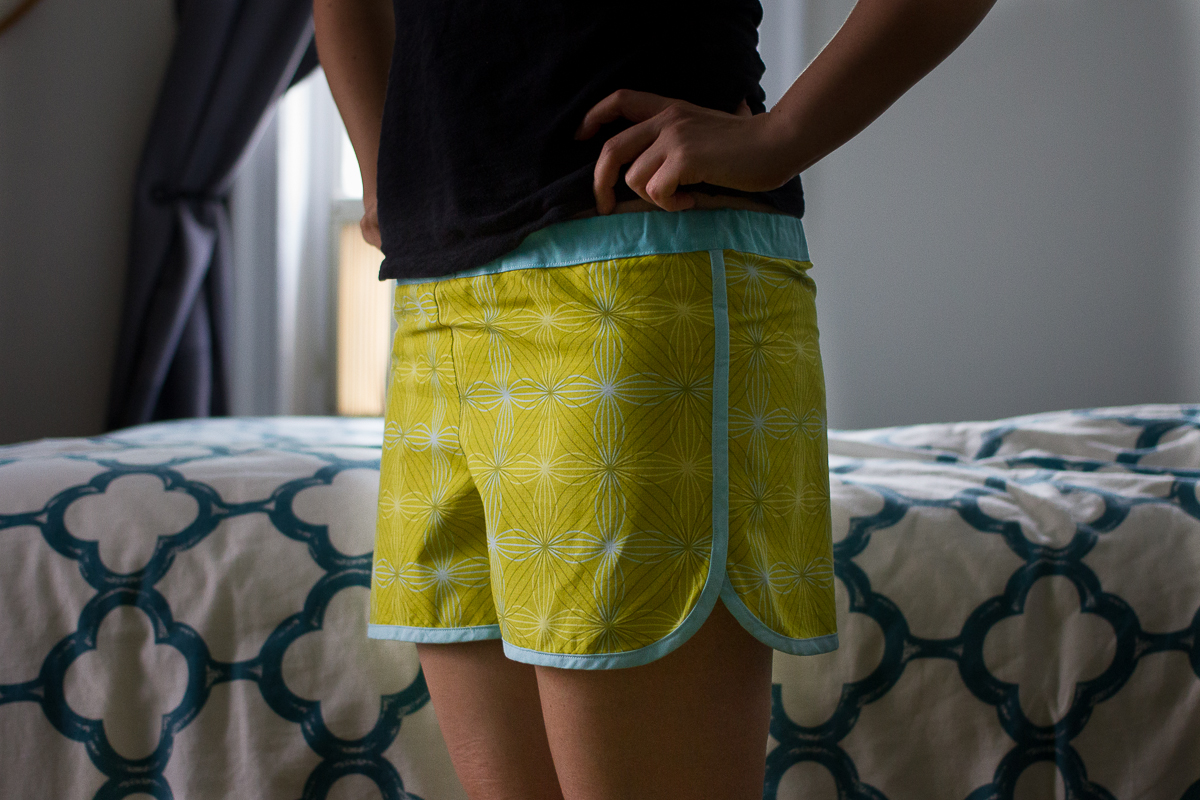
blogger’s quilt festival

Amy's Creative SideWell whaddaya know, there’s a whole quilt-blogger thing going on right now. I’ve been a knitblogger for just shy of 7 years, but I’m only just now really starting to quilt. I’ve been adding quilt blog after quilt blog to my blogroll, and suddenly everyone I follow is participating in the Blogger’s Quilt Festival, an amazing community event put on by Amy! I want in, too! I’ve found a bunch of great quilting blogs, and this will be a great way to find more. While this space will always be a healthy mix of knitting/crocheting/quilting/eating/photography, I hope there’s something that other quilters will enjoy, too. I feel badly that I’ll just be featuring the quilt from the previous post, but my current stance is that my most favorite quilt is always the one I just made, so how can I resist? I’ll show a few different photos of it, though.


(the top, pre-quilting—despite the fold creases, the best pic I have of the top)

In my last post I was awfully cursory in details about the quilt, so this gives me an opportunity to share a little more about it. The truth is, this quilt was inspired by a crocheted blanket! I used to work at a crochet magazine, and we had a folder full of “swipe”—images pulled from vintage pattern books, etc., to use as inspiration. This one, from some anonymous old pattern book, was never used in any of our crochet designs. The blanket in that photo (which I can no longer find) was made of just three colors, and it was honestly hideous, in red, blue, and white. Somehow, though, it did not strike a patriotic air. Just a mismatched, sad one. But it gave this optical-illusion of depth and the idea got into my head as perfect for a quilt.

I toyed with making the quilt solely out of 3 colors, like in the original, but I had that Poseidon pack of fat quarters, and it seemed a good way to make use of it. I thought I could eke out all the squares with just fat quarters and my large stash of Kona Snow, and I came so very close, but the secondary color in each of the outside two rounds of squares needed more fabric. I started this quilt in the summer of 2010, during my friend JulieFrick’s “60 Blocks of Summer” challenge—for which I was successful only because of these little squares! But then I stalled, and didn’t pick it back up again until one week before the quilt was given to my friend’s sixteen-month-old. Each block measures 6 x 6 finished. The final quilt is 7 squares wide by 9 squares high, so it comes in at around 42 x 54. That’s actually pretty big, in my opinion, for a kid’s quilt, and if I were to use this design again (and that’s highly likely), I’d make the darker center just two squares high.

Since finishing this quilt, I’ve sketched out other configurations. I know they’re not rocket science or anything, but it was helpful for me to see this visually, to be able to make it small and see what it will look like from afar. My boyfriend and I want one for our living room (likely in shades of green, hence the colors in my sketch—obviously, not nuanced at all here, just something to get the effect), and I’m not sure exactly how I want to make it larger, whether just more squares or to actually increase the size of the finished squares to 8 x 8 or something. I was highly systematic in the measurements of the first (the way the center square steps down and the outer ring steps up is by a quarter inch each time), and changing the final dimension might not allow me quite the same perfect finesse.

Stay tuned for more variations! See all my photos of the quilt, including more of the backing and the label, in my original post.

blanket for eleanor!

I cannot even muster up any modesty here. My love for this blanket exceeds well, most anything else I’ve ever made. Isn’t it fabulous? I had a vision, and it came together even better than I had imagined!

The fabrics are all from the Kona Poseidon pack of fat quarters, though I did have to buy more of two fabrics, all bordered by Kona Snow. The binding is another turquoise Kona—I didn’t pay attention to the name when I bought it. Basically, I have no idea what all the colors are, exactly, but they’re all Kona, and the bulk of the colors are from the Poseidon pack. My original idea was to have all the squares made out of the same 3 colors, allowing the changing size configuration to give it graphic punch, but I was able to make good use of just quarters by working out this progression; the effect gives it even more depth, I think. I love it so much that I want another, larger one for myself—and have thought about writing it up as a little pattern, once I tweak and perfect a few hiccups—but picking the fabrics is going to give me agita: how ever will I get the combo right a second time??

Because yes, I gave this one away, to my friend Liz’s daughter. I started the quilt for her before she was born but ran out of fabric/took forever to get more/got distracted by other things, so only finished it up last week, in anticipation of finally meeting the little stinker, who is now 16 months old, this past weekend.

It’s backed in a single panel of corduroy to give it some warmth and softness (though it added a slight challenge in the quilting—definitely needed the walking foot!). I give thanks to the awesome staff at Purl, who immediately had great suggestions when I said I didn’t want to piece the back. The label is embroidered on a small patch of Kona snow. I love it, too, especially because I’ve never had the patience to actually create a successful embroidered label before. I also have my personalized ribbon, which I added to the top corner. The white text is kiiind of not as legible as I’d have liked, but it suffices.

Wavy quilting lines also help to soften the rigid structure of the piecing; it was my first time doing wavy lines. I know they’re not especially difficult or crazy, but I’m taking baby steps with each quilt and my quilting, so this felt like an accomplishment to me! I’ve seen the technique used by many quilters, but I was definitely inspired by Bijou Lovely, and her video helped me feel confident when I tackled it myself. I used three different colors of thread for the quilting just for some variety, especially since the backing was solid. (Those creases are from folding and transporting it to Maryland.)

My experience with little kids is extremely limited, but I learned this weekend that there is nothing cuter than a baby saying “baby?” Eleanor’s reaction upon being told that the blanket was for her was so awesome. “Blanket for baby? Baby?” And then shrieks and grabs and even putting it in her mouth and carrying it around the house. For once, listening to a little toddler cry out “mine!” gave me pangs of pride. So enjoy your blanket Eleanor, made especially for you by Aunt Erin!

a birthday beret!

This is my friend Carol. If you’ve been to a Vogue Knitting LIVE, and been in the Marketplace, you might have seen her dash past you as she worked the event. And I mean dash—this girl does not move slowly. She’s tireless at everything she does, from running marathons to drinking coffee to just plain talking. And she just raced to age 30.

Leading up to her birthday she was downright shameless. “Erin! I’m turning 30! Knit me something!” and “I love alll knitted things! You could knit me anything!” and even “Don’t you want to knit me something for my thirtieth?” I am certainly not immune to that kind of enthusiasm—I’m not made of stone, people. (Can we talk for a moment about her new dog, Ritz, and how adorable he is? Never did you see a more chill, laid-back dog with a more hyperactive owner. He comes to the office from time to time, and of course celebrated her birthday with her. His sweater, by the way, was store-bought.)

So after I finished the Bulky Topper, I knit her this hat, from Vogue Knitting’s Fall 2009 issue. (It’s actually the cover hat, modeled by a former America’s Next Top Model contestant!) The yarn is the remaining Sanguine Gryphon Skinny Bugga that I used in my Buckwheat, and though I think I had a different gauge than the pattern, it fits just right. It was a speedy knit and easy to memorize. In fact, it was my plane knitting because I had all my WIP patterns only on my phone, digital, so I knit this at takeoff and landing. I blocked it over a plate on the radiator and it softened so nicely to a great drape.

Let me tell you, when I gave it to her? She literally jumped up and down and shrieked with joy, put it on, told everyone how awesome she looks in a hat (before she’d seen herself in it), and ran around the office to show it off. The next day she planned her outfit specifically to coordinate with it and wore it for the entire day, too. Honestly, guys, never was a handknit item more well received. I better start planning for her 31st!

tenderloin sandwiches

I don’t quite know how it happened—I’m a good mid-Atlantic girl!—but I find myself these days literally surrounded by Midwesterners. They have a particular brand of earnestness, niceness, and . . . odd childhood food favorites. When we are all together they’re always reminiscing about some Cool Whip–laden dessert or cheesy baked dish. I personally don’t recall ever eating these things growing up. Crab cake, anyone?

One thing they’re forever talking about that you just can not find outside that expansive section of our country is the tenderloin sandwich. They clamor to tell me how it should be eaten: on crappy hamburger buns / with little to no condiments / where the meat is so big it exceeds the bun by inches all around / with something like waffle fries from a bag. Sounds . . . delicious? Waffle fries would be a guarantee, at the very least.

They found recipes, settled on one, and decided we would have a whole Midwestern night. Somehow, however, I ended up in the kitchen doing all the cooking. I pointed out that I was the only non-Midwesterner. Holly said “We know how to eat them, not how to cook them.” It fell to me to butterfly pork tenderloin while Holly, Jason, and Chris pounded them flat and then breaded them up. I fried them all to what looked to me to be crispy perfection. (And let’s be honest. The idea that I might relinquish control of my kitchen was a folly.)

We piled the giant tenderloins on Wonder Bread hamburger buns (I added lettuce and mayo) and dug in, with waffle fries and supermarket cole slaw on the side. And you know what? It was truly delicious, in the way only an all-white meal can be.

A few lessons learned, should you want to make this yourself:

  • Do not be afraid to pound this out to absurdly large diameter. It shrinks up a LOT once it’s in the oil (think bacon’s shrinkage). Go even bigger than you think, if you want it to hang over the bread like it did in your childhood.
  • Keep the oil very hot. Even in my cast iron pan, it cooled if there were two pieces in the pan, leading to longer frying times.
  • Lettuce adds a much needed brightness and crunch. I conveniently had iceberg in the fridge; I don’t think any other kind would be appropriate.
  • Wonder Bread hamburger buns are really perfectly soft.

Pork Tenderloin Sandwiches
Cut a whole boneless pork loin into 1-inch pieces. Butterfly these pieces and then pound between two pieces of plastic wrap (as you can see, I bought my Saran Wrap around Christmas, so it’s red!) til 1/8 inch thick. We use old empty heavy salsa jars to pound, but a meat tenderizer would probably work best!

Dip the pounded meat into water, then dredge in a mixture made up of 2 parts flour to 1 part cornmeal, seasoned generously with salt and plenty of pepper.

Heat a half-inch of vegetable oil (I used canola) to super hot in a cast-iron pan. (I didn’t put a thermometer in to test the temp, just tested the oil by tossing loose flour into the oil. When it sizzled like crazy, it was ready.) Set the breaded tenderloin in and fry til golden brown, about 3 minutes a side.

Serve on crappy buns with desired condiments (DO NOT BE AFRAID OF CONDIMENTS, MIDWESTERNERS).

meet Bob and his brother, Bob

My three quilting bees are pretty much all wrapped up now (I think one person still has to take her turn!) and I’m finally (finally!) finishing up all my blocks. I started out gangbusters on bee blocks, completing them within the allotted month every time, but then the job and life got a lot more busy, the apartment was rearranged, and I slacked off something awful.

Luckily, my bee partners have been pretty forgiving.

My most recent bee blocks finished were for Chawne, a quilter/knitter/crocheter extraordinaire. This is the second time I’ve made blocks for Chawne, actually. I should blog the others! (I’ll get to it.) This bee we called the “Twitter Bee Solid Six” because we were all keen on making all-solid quilts after our first bee together, the Twitter Bee. Only six of us wanted to participate in this offshoot, so we decided to make it a six-month-long one, giving 2 months for each person.

Bob 1

Chawne asked us to make block-size versions of her quilt pattern, named Bob. (Each of these blocks is 16.5 inches square.) She designed this and wrote it up for Fat Quarterly, but shared the details with us. The smallest squares have a finished measurement of 1-inch square, so precision is key. It was a lot of careful cutting and sewing, and I did a pretty good job I think! Some of those seams don’t line up exactly, I know, but a lot of them do!

Bob 2

The fabrics are shot cottons; Chawne provided something like 30 different colors to each of us! I wonder how she’s going to combine them all…