At long last, I have made a quilt intended to live on my own couch. I have one other quilt, my beloved KBeeC quilt, but that is large and sometimes we just want a little something on the couch.
I used the templates provided by Sing All You Want for the Arrow Tail quilt, but instead of matching each row I offset every other. I grabbed all shades of aqua, yellow, and gray; many of the fabrics in here are the last bits of some of my very favorites.
Once I finished the quilt top—a straightforward affair, though I am not in love with matching up angled pieces—I decided to keep all the scraps out and work with them to make up the backing. I cut squares and built some improv/wonky log cabins. It was a lovely, mindless sort of piecing and everything came together so nicely. In fact, it seemed easier and more satisfying than the front, where it was so much more structured.
Ultimately I took a ton of the small remaining triangle-shaped scraps and made those into HSTs that will appear in a different quilt, so I worked with 8 log cabinsto build the backing. I didn’t plan this out carefully at all (the 8 squares didn’t actually match up with the width or height of the front) and I love love love it.
I quilted it with wavy quilting lines, because that’s about all I can handle—my straight lines look wavy, too, so I might as well go for it. I bound it using the machine entirely; this was the first time I’d done that. The front looks really sharp and neat! I’m pretty pleased with how that came out. The seam line for the binding, though, is not flush with the fold from the first fold/seam of the binding, and that makes it more visible. (It’s about an eighth of an inch in from the edge of the binding.) But it’s really even the whole way around, so I don’t really care.
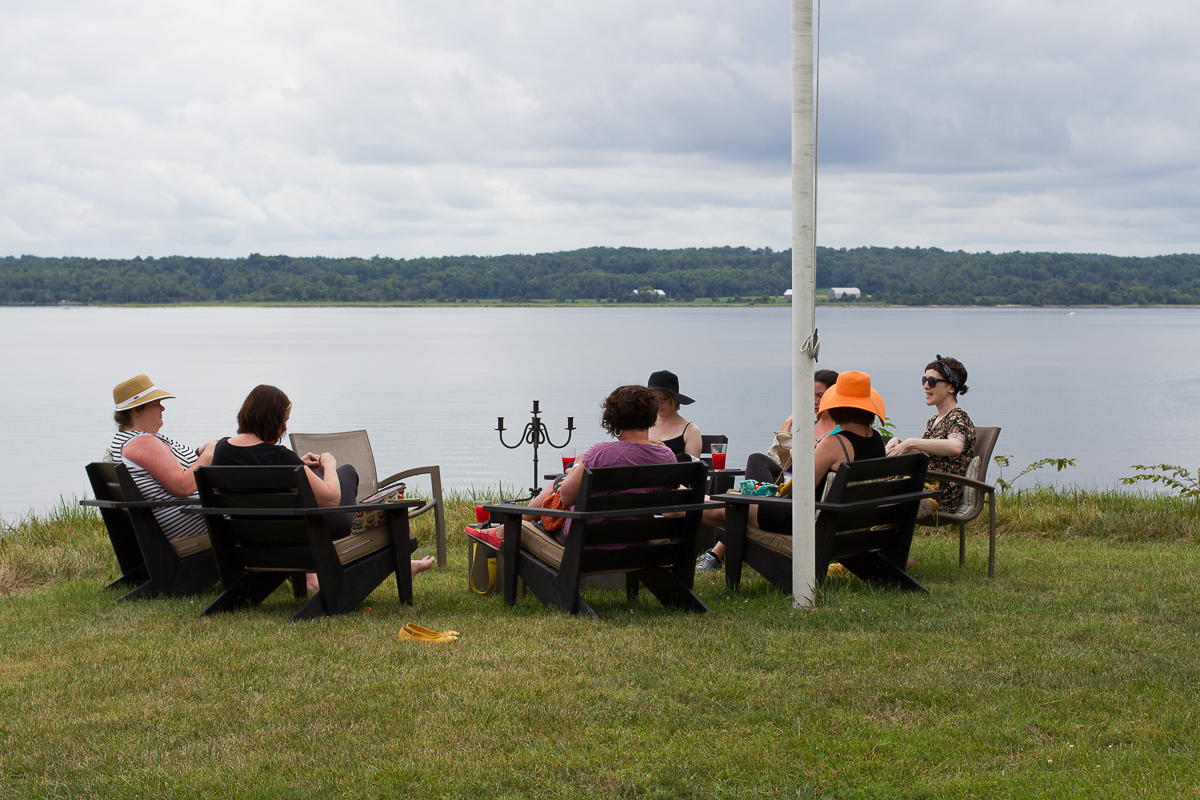
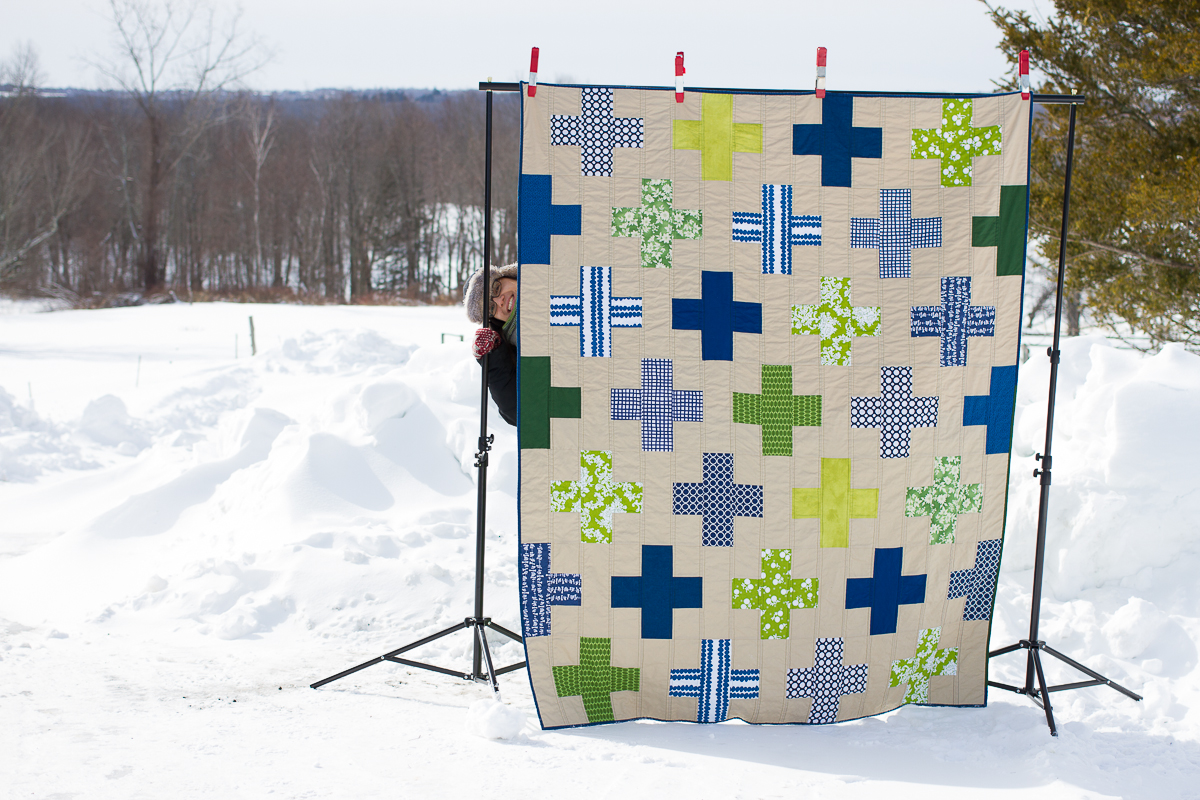
Last weekend, my knitting best friends and I got together for another weekend away. This was the tenth time we’ve done it! It’s only the fifth time we’ve swapped something—and this round, a crafter’s choice, I got to make for JulieFrick! Because it was our tenth meetup, I chose to make a big “X” mini quilt, in colors that I thought she would like. Well, I thought she would like them after we created a spreadsheet to note favorite colors, and she specified “I like most all colors when they’re a bit “off” of their standard rainbow-bright versions.” This required some serious stash-digging, because when I stopped to think about it, I like colors specifically when they are bright!
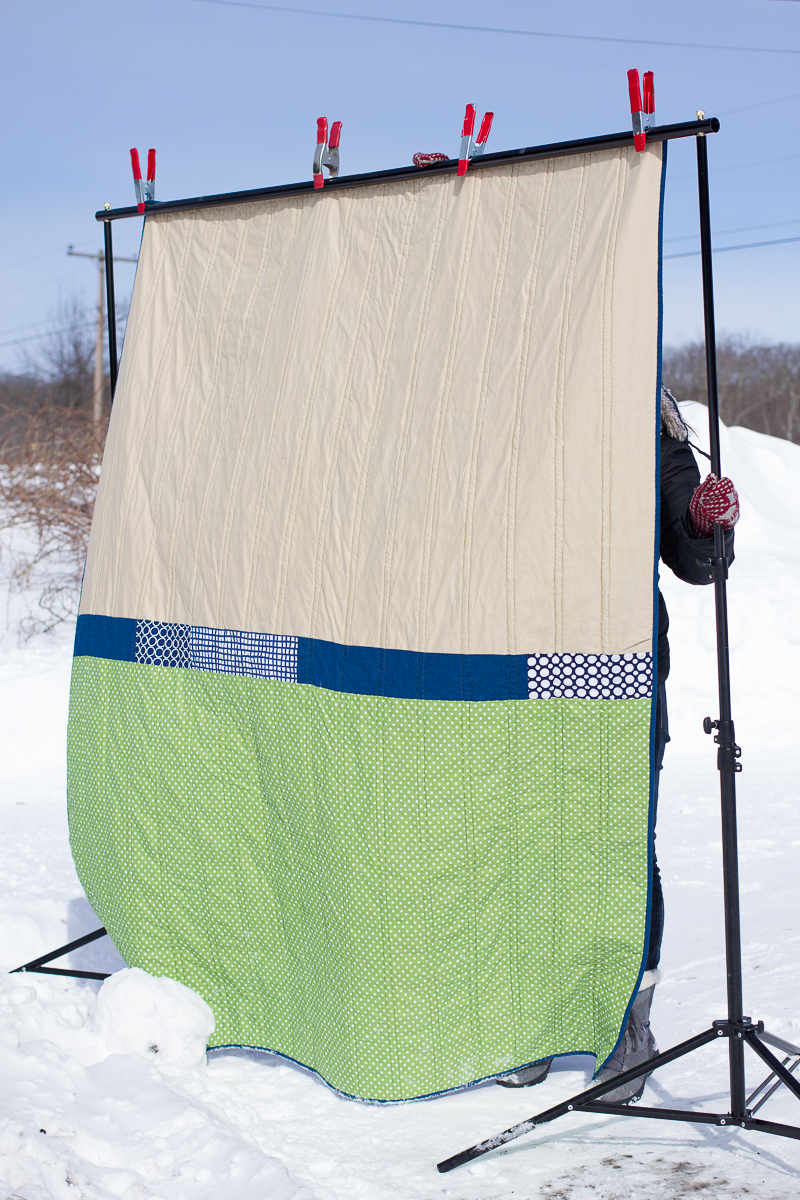
It’s just a basic string quilt, but I did it as a quilt as you go, using wavy quilting lines (I neglected to take a close-up shot). This was the first time I’d made an actual quilt using QAYG, so the backing part was a stumbling block. (Every other QAYG I’ve done was a pillow top.) I decided to do a whole cloth backing and stitch in the ditch along the “X” to hold it all together. We liked its flatness so opted not to wash it. The binding is a slightly darker shade of the stone color I used for the X (both Kona cottons, from fat quarter packs, so I have no idea what the color names are).
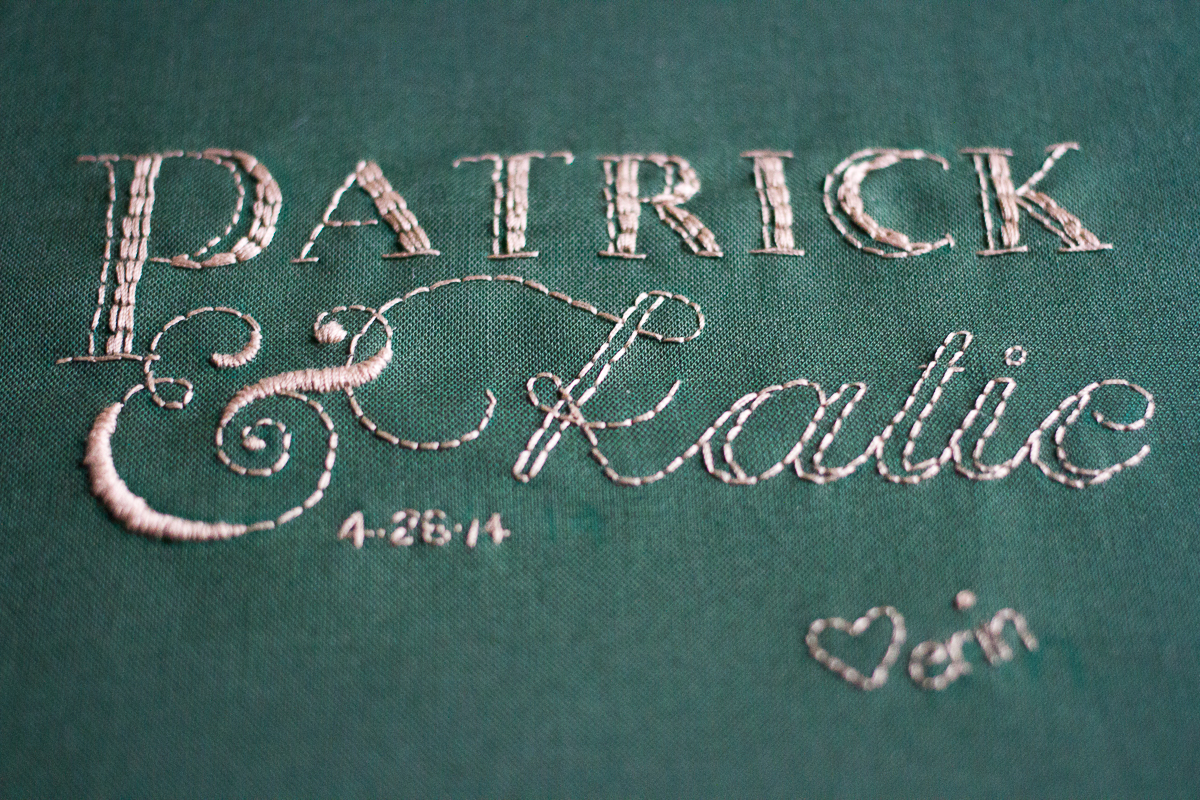
I decided the piece needed a really great label to commemorate the occasion. I designed this in Photoshop using various fonts, which I then traced onto some Kona and stitched using embroidery floss. “Celebrate” probably could have used a bit of a different treatment, but it feels pretty festive! It was fun to stitch it up. When I have the time to devote to the label, I am always happy with the results. I should start planning the labels first!
I love that I got to give this to Julie in person. She’s one of the most interesting and passionate people I know—I learn so much about how to be a better person from Julie. She makes amazing jams and other preserves, can knit and crochet anything she wants, and works tirelessly in service for the good of the world. How lucky am I to be her friend! I feel that way about every one of these women, actually: They’re my people. I learn from them, maybe I help them learn some things, and I trust them implicitly. We spend these weekends eating amazing meals, knitting/crocheting/stitching, and sharing deep—and truly shallow—conversations (this time, while bobbing in the pool). We are already planning our 11th weekend away, and I cannot wait.
Last summer when I gave my cousin Meg and her husband Josh their quilt, it was the same week that my cousin Patrick and his longtime girlfriend Katie solidified their venue and wedding date, so we got to talking about colors, personal preferences, etc., because I knew I’d make them a quilt, too. They both liked the colors in Meg’s quilt but definitely seemed to be leaning blue and green rather than the blues, greens, and purples I put in that one. I floated the idea of asymmetry and that was not met with enthusiasm, which is just fine, and helped greatly in narrowing down what kind of look I’d go for. I hit on plus signs and was sold—perfect for a wedding theme, and the bride works for the Red Cross! I mean it was meant to be. I kept the design a secret from them, though.
Several fabrics were left from Meg and Josh’s quilt, and I liked that I could use them here. I bought a few new ones to round it out, and then I set to cutting strips. I liked the pluses to have one long leg and then the cross-piece, rather than piecing the plus like a 9-patch. I even deliberately cut the strips so that the direction of prints would cross too.
This one came out pretty big, but with Patrick well over six feet tall, and Katie not far behind, it seemed good to go a little big. It’s about 65 x 80, I think. This meant quilting it was an enormous ordeal, and I’ve sworn off quilting on my dinky home machine any longer. As a result, the quilt got only straight doubled vertical lines because there was just no way I could curl it up crosswise and get it through the narrow throat. I like the simplicity, though.
This was shot in February on my knitting weekend away with friends, using the awesome stand that Caro brought for me to use, on a somewhat windy day. In fact it seems Caro took two of these photos for me, though we’d originally planned for me to just do the shooting myself. Anyway, we did this before I made the label. (I finished the quilt specifically for this weekend away knowing I could have a nice photo shoot there!) So this is what the back looked like before I added the label. Hilariously, now that I’m looking at this picture I see that I originally thought of the green polka dot on the back as the bottom! Oops, I totally forgot that and placed the label in the khaki in the lower right. There’s no real top or bottom to the quilt, of course, but as I was piecing it I oriented it this way, so I always thought of that as the top. Ha! Want a peek at the label? Check my most recent post, here.
As always I hope the blanket brings my cousin and new cousin-in-law comfort in times spent snuggling on the couch! We leave for the wedding tomorrow and the weather is due to be 85 degrees—a sharp contrast to what it felt like when I photographed their quilt!
In two weeks, we head to the wedding of my cousin! He’s known his bride-to-be forever, and in fact I’VE known her since she was in high school, if that gives you an idea. We’re thrilled to see them getting married and can’t wait to party with that side of the family. Of course, I sewed them a quilt. I need to mail it off to them—but I’ve never mailed a quilt before, so it feels like a Big Deal and I’ve been avoiding it—before I show you the final product, but for now, a peek at the label:
I was inspired by all the typography stuff that’s become so popular lately; it seemed perfect for an embroidery project and would feel “of its time.” Also I didn’t want to cop out like I have in the past! This is a proper label, made separately, hand-stitched on, etc. It helped that I finished the quilt a while ago and knew I had plenty of time before I needed to send it out (that is, I wasn’t staring down a hard deadline). I just used a khaki colored thread that matches the background of the backing, and I like the effect. The solid green is a Kona cotton.
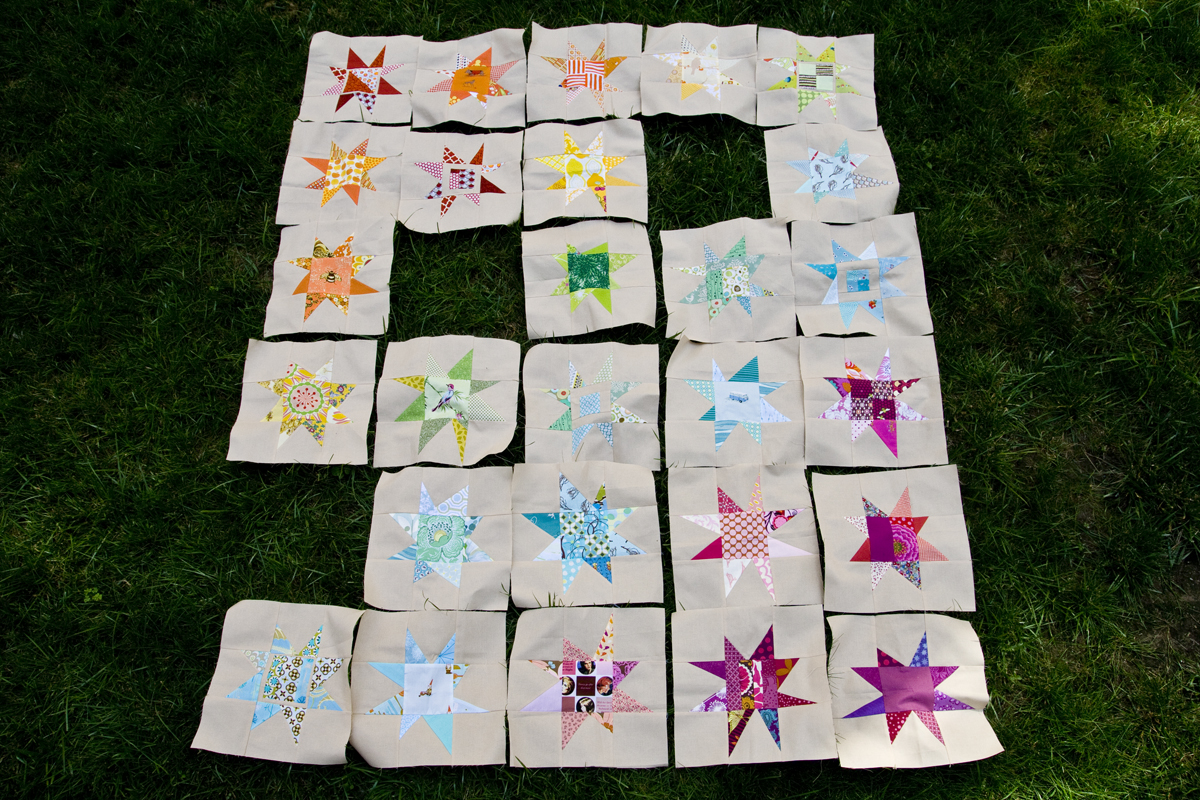
When the online quilting bee that made this quilt started years ago, I had pretty much zero quilting experience, much less bee experience. In retrospect, I committed a huge quilting bee faux pas when I made my request! Luckily, this bee was formed with really good crafty friends who didn’t mind. And you know what? I don’t regret it in the slightest, because it made me a quilt that means so much more to me. So what gaffe did I commit?
I asked everyone to use fabric from their own stashes to produce the main motifs. I provided a generous amount of background fabric and asked them to sew a 12-inch wonky star that, from afar, you would identify as a star of a single color (even if individual fabrics were made up of many different colors). I made no limitations other than no neutrals/blacks. There was no requirement that they use lots of different fabrics in a given block—a single fabric star would’ve been fine.
But what I got was a treasure trove! The feedback was all positive—and because I erred on the side of far more background fabric than was really necessary, many made me more than the 3 blocks the bee specified. In the end I was given 27 amazing blocks in all colors from Maritza, Caro, Nova, Diana, Julie, Christy, and Pam. And I can look at any given star and know exactly who made it, which I love. I needed to make just 3 more myself to complete a 5×6 top. I played around with their placement, starting random and ending with the rainbow of goodness you see here:
I captioned that photo “swoon” at the time (back in 2010!!) and I still feel that way when I look at this picture. My love for this quilt in progress was huge! But making those last 3 blocks just . . . didn’t happen. Two years later, in the spring of 2012, I pulled the fabric out, filled in those gaps with stars in the right colors, cut sashing and made a backing and all that. (I made three wonky stars for the back, too.) The quilt was suddenly enormous—just shy of a true queen size. I decided it would be perfect for our bedding at beach week, so then I was racing to finish up. I ran into a wrinkle, literally, when the quilting started catching puckers on the straight lines, so I only machine quilted the sashing and decided to hand-quilt an echo around the stars. But I’d never hand-quilted before, so I was going to need to amass supplies. I went ahead and sewed on the binding and was hand-sewing it down in the car on the way to Jersey (the hand quilting wasn’t going to be near the edges, so I could bind it before finishing the actual quilting).
We stopped at a JoAnn Fabrics on the way, where I bought hand quilting thread, needles, etc. At the beach I went online and researched how to hand quilt. We were using the quilt on our bed, but every morning I scooped it up, brought it downstairs, and quilted in the living room before we went up to the beach for the day. I learned a lot about hand quilting in that week, and while I enjoyed doing it, I have lots of practice ahead of me to be actually good at it. I didn’t quite finish quilting all the stars while we were there, so there was no triumphant photo shoot like I’d intended.
After we got back, I finished, but by then we were using it on our bed and I just never got around to photographing it. I still love it to pieces: We keep it on the couch in winter and use it on our own bed in the summer. So we brought it to the beach again this year, and on our last day I finally had the photo shoot! Big thanks to Jason and my dad for holding it on what was, as you can see, a super windy day.
These pictures give you the overall sense of the quilt but sadly they can’t capture the awesome of each individual star. They’re endlessly interesting to look at, with choice fabrics used in small amounts and even some fun “I spy” elements that my boyfriend thinks are great, like the gnome, the bus, and the shaky dogs! I couldn’t resist taking pictures of each block so you could see them a little better. Click on a row below to see that row bigger.