


a tale of two onesies
Yesterday, my friend L and I got together for a crafting afternoon. Our mission? Freezer paper stenciling onesies. i’m sure there are tutorials out there on the web, but I didn’t quickly find one when I briefly looked for it, so here is my brief guide to using freezer paper stencils to paint adorableness onto clothing. It’s super easy, and you’ll figure it out yourself, but it’s nice to know you’re on the right track, I think.
Step 1 is to procure the materials. Onesies are cheap from Target or other big box stores like that; fabric paint is not so cheap but the smallest containers I found at the art store will last me for YEARS. I got Jacquard fabric paints, because Jacquard is a dye company I know is respectable. For brushes I got some little sponge-tipped brushes, because I knew we’d rather dab than paint. And finally you need the freezer paper. This is a kitchen item, usually, so look in your grocery store aisle with the wax paper, saran wrap, etc. I must confess I got mine from my mom, who had a roll and was like, ‘yeah, take it.’
Step 2 is to design your motif. I used the computer to draw out what I wanted, since mine was going to be type-based. L looked for images online that she could use as inspiration, and she freehanded hers. Look for pieces with bold areas of color–fiddly use of many colors is not going to work here.
Step 3 is to transfer your motif to the freezer paper, then cut it out. Freezer paper is thin enough that you can just trace. Ensur that the shiny side of the freezer paper is down. Use an X-acto knife to cut the shape out. Think it through: Keep in mind that what you cut OUT is what you will fill IN with paint. So sometimes, if you want to keep an area in the middle white, you need to preserve part of the “insides” to be stuck on separately. If you are doing more than one color, trace your uncut image over more than once so you aren’t just hoping things will match up later when you redraw the shape.
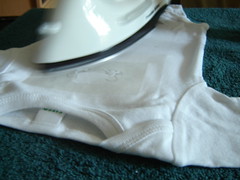
Step 4, you iron on the stencil! The freezer paper box recommends a “hot iron” for ironing it on. We set the iron to “cotton/linen.” Place the stencil on the onesie where you want it, with something behind it (we put a piece of paper between the layers), just to protect the back of the onesie. Press the iron onto the stencil. Avoid squiqqling the iron around if you have small parts, because you risk shifting them before the paper is set. Just press down; it’ll adhere within 10-15 seconds.
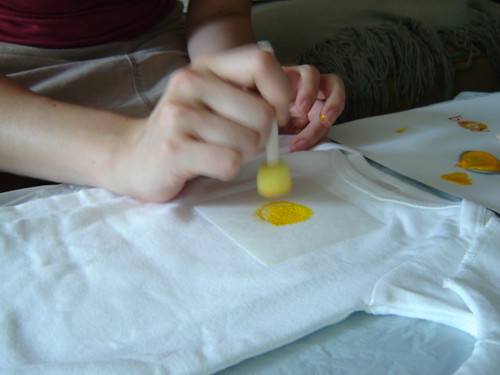
Step 5, paint. Put a small amount of paint on the brush and just tap it onto the stencil, ensuring good coverage and paying attention to the edges.
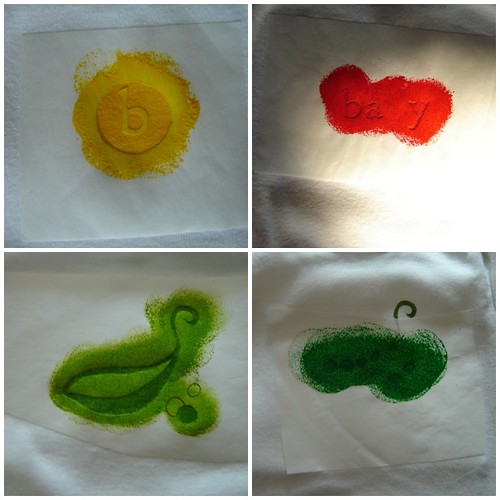
Step 6, the hard part: Wait for it to dry. While it’s drying, I’ll show you an example of our first layer and second layers, so you can kind of see the process a little more closely. Note that we both wanted to preserve white areas within our motifs, so we had separate elements to cut out and stick on. They are simply ironed on with the rest; no sweat.
Step 7, the best part: Peel off the stencil. It comes off really easily; don’t worry!
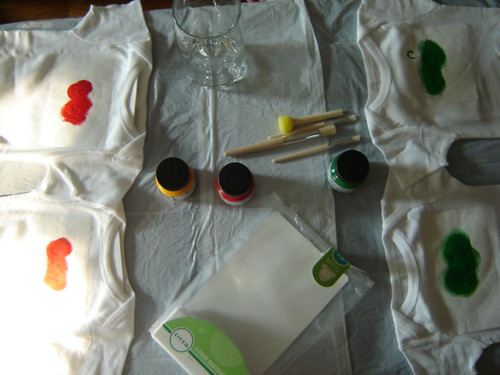
Step 8 is to repeat steps 4 through 7 with your second color. Be mindful when you set down the second stencil, so it’s aligned properly. We have no tricks for this, just our eyes. We did a decent job of it, so I wouldn’t fret too much.
Step 9 sets the ink: Iron the back of the painted image for 30 seconds with a hot iron. This should make it washfast (according to the dye we used).
Step 10, stand back and coo over how frickin’ cute they are! Decide you are going to go into business creating these. Wish you had more handy to make more immediately.
Lessons learned: When applying ink to thin elements, like type, don’t get all overzealous with the paint–it might bleed just a wee bit. But when applying ink to large elements, like circles, do your best to ensure there’s adquate coverage at the edges! Ah, it cuts both ways.
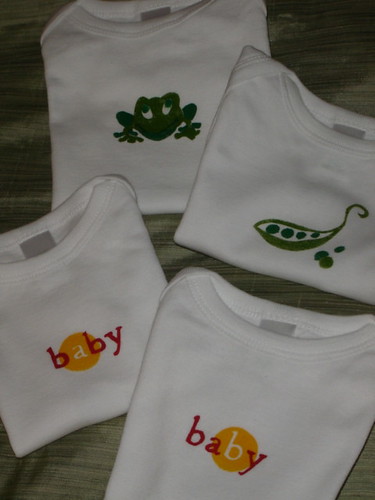
Explanation of our chosen motifs: Remember the dinosaurs I made? (Stegs and Trice) They’re for the upcoming twins of my friends C and TJ (who occasionaly reads the blog, but I’m hoping he won’t between now and the shower next Saturday). And when they had their first ultrasound, the little girls were labled “A” and “B.” So I made “baby a” and “baby b” onesies! My friend L bought the most adorable frog towel (a hooded towel, where the frog head is the hood) and a little stuffed frog that ribbits for her college friend, who’s pregnant with one. So she made a frog. She also wanted a “lil’ sweet pea” piece, so she made the pea pod, which I’m totally going to be using for some future child, because I luff it so much.
40 Responses to a tale of two onesies
So cute! You guys did a great job. I really want to try this some day!
Beyond cute!
These are darling! I have several babies to welcome in the future – thanks for the sweet idea and tutorial. I really love how you differentiated baby “a” and baby “b” – clever!
*love* *love* *love*
…especially the pea pod one. Super cute!
Wow. Those are so adorable!!!! You need an etsy shop, my friend. :-)
I love the Baby A and Baby B part. A definite crowd pleaser!!!!
So adorably cute, I know there will be much cooing and ahhhing over those onsies. Great ideas on the designs too!
Baby A and Baby B onesies. Love them! Great job! And, stenciling is probably much faster than another knitted gift of the same cuteness.
So cute! I love the A and B onesis– such a great idea :)
Ok, wow–love the baby a and baby b concept, sort of like Dr. Seuss’ thing 1 and thing 2!!
Great job! They turned out so cute! Good gifts!
The bAby and baBy onesies are soooo clever!
What creative and fun onesies! The recipients will be so tickled!
Thank you thank you thank you for your “tutorial” on these stencils! I plan on doing a bunch in August for my baby who’s due in Sept. Yours are adorable!
These are so clever and cute! Onesies are so useful for lil babies, and adding a personal touch is such a great idea.
Cute!
Question: When you’re ironing the back to set the ink, did you just iron the back of the onesie? Was the paper still in there? Or work the iron into the inside? Thanks!
Those are just too precious. I have used freezer paper as stabilizer, I never even thought about stencils! Thanks for the inspiration! Oooo, I wish I had everything here to get to work NOW.
Very cute!
awe these are so cute!
Those are super cute! Thanks for sharing the instructions and pictures of the finished products!
They are sooo cute! Such a fabulous idea!
Incredible cuteness! I too have friends and cousins with babies on the way … must buy supplies! :)
The baby a and b, so clever.
Those are so cute! My cousin is about to have a baby so now I have a new project to try :) You two are so creative!
Freezer paper stencils are a love of mine as well!! You guys did a great job! They are adorable!!
Oh my goodness! So sweet!! Thanks for the amazing tutorial, now I just need some free time!
very cute! Freezer paper is quite fun, such great results so fast (Except for the drying!)
So very, very, VERY cute!!!!!!!
Great tutorial! Especially loved the two “baby” ones. I’ve got a pack of onesies waiting to be personalized right now as everyone at my work seems to be having babies at the same time!
How very sweet! Great tutorial – you make it look and sound so easy! I may just have to try this out this summer :)
Those are so cute! I’ve got to give that stencil techn. a try sometime.
how cute! i keep seeing these pop up on blogs, and eventually i’ll get around to doing it!
absolutely adorable! love the baby a and b especially. too bad baby doesn’t have a c in it because my brother and his wife are having triplets. i discovered you through dogged and am enjoying your blog.
OMG! How adorable are these!!!! I have to learn how to do these….My best friend is having another girl in August…..Thanks for the tutorial!!!!
BTW, I love you blog…My first time visiting. I found you over at ExercisebeforeKnitting
OMG! how cute are those! I’ll have to give it a try…
Just came across your blog and lovin it so far!
E, I just LOVE these onesies!
ADORABLE! sure beats the crooked, “Grandma’s Girl” machine embroidered onesies I got, yeck.
So freaking cute!!! Since everyone I know seems to be pregnant right now, I see a lot of these in my future…
Those are really adorable – and such stylish designs. I’m almost tempted to get some freezer paper and make myself a T-shirt with a whale, lobster, and palm tree. (Those are the only things I can draw.)
I just love the ones with Baby on them, and the 2 different color changes. How clever you both are. I am sure the new mums will love them for the babies too.
o.m.g. Too frickin cute for words. And baby a & baby b, so clever. Sometimes, girlfriend, I just gotta shake my head at all the talent you possess. And I mean that in the most sincere way possible!!!!!!!!
You do need to sell those Baby A and Baby B onesies at the pregnant-with-multiples store (there is one, right?). If not, you should START a pregnant-with-multiples store just so you can sell them. So adorable! So clever!