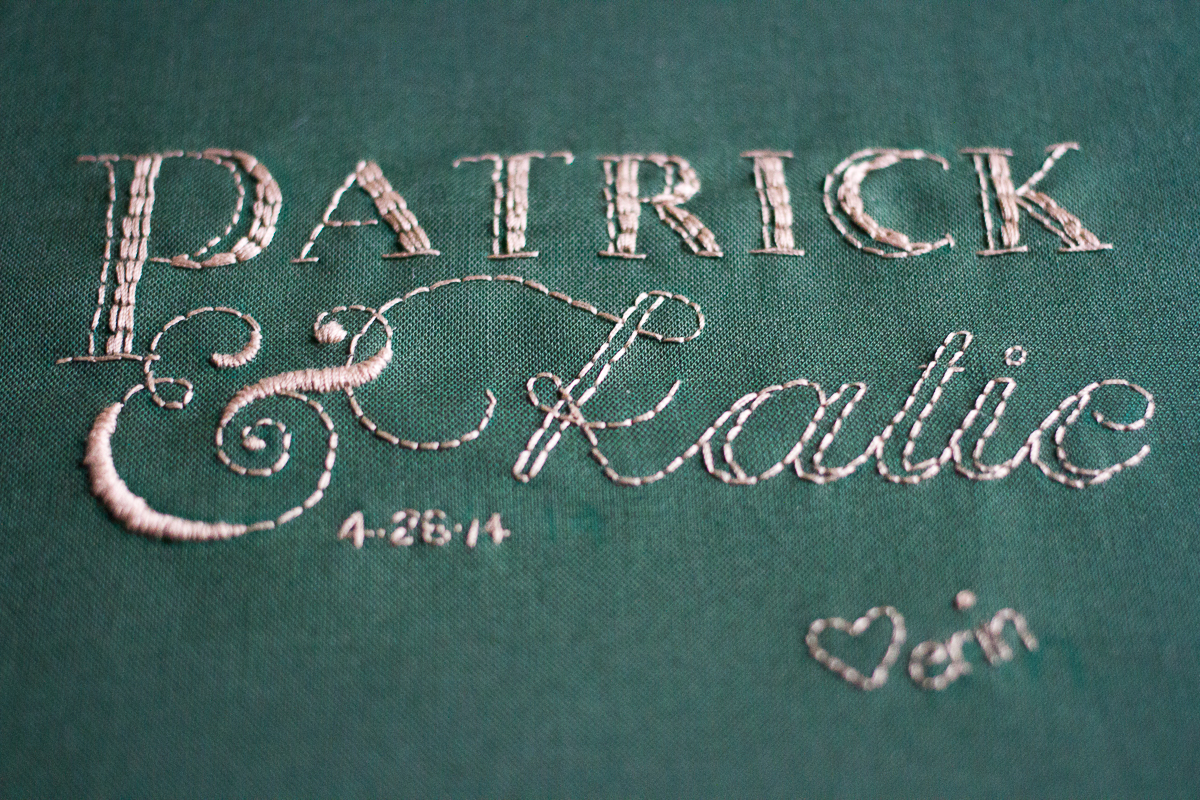
In two weeks, we head to the wedding of my cousin! He’s known his bride-to-be forever, and in fact I’VE known her since she was in high school, if that gives you an idea. We’re thrilled to see them getting married and can’t wait to party with that side of the family. Of course, I sewed them a quilt. I need to mail it off to them—but I’ve never mailed a quilt before, so it feels like a Big Deal and I’ve been avoiding it—before I show you the final product, but for now, a peek at the label:
I was inspired by all the typography stuff that’s become so popular lately; it seemed perfect for an embroidery project and would feel “of its time.” Also I didn’t want to cop out like I have in the past! This is a proper label, made separately, hand-stitched on, etc. It helped that I finished the quilt a while ago and knew I had plenty of time before I needed to send it out (that is, I wasn’t staring down a hard deadline). I just used a khaki colored thread that matches the background of the backing, and I like the effect. The solid green is a Kona cotton.
Last October, I browsed the halls of Rhinebeck with nothing in particular in mind. I wasn’t really knitting too much, so I mostly went to spend a day with friends and see some sheep. But then we passed through Oasis Farm Fiber Mill‘s booth and petted their yarn and came to a screeching halt. It was so so soft, despite its rustic appearance, and we all wanted it. I decided it would make a lovely gift for Dad for Christmas. So I called my mom and asked her if Dad is allergic to angora and what color she thought he’d like in a scarf. I debated among their colors for a time before settling on a pretty heathered blue. The yarn doesn’t have labels so I truly have no idea which yarn I bought, but I think it’s the “Classic Bunny” (because I don’t recall picking one with silk content, but who knows).
There was no way I would knit something up in time, nor could I be sure my hands could handle it, so I brought out my little 10-inch Cricket and got to work the week before the holiday. I worried about warping it with this yarn, as it felt delicate, but I didn’t know how to resolve that issue so I just barreled ahead and crossed my fingers—I realize that I’m lucky it held up just fine. I know just enough about yarn to be concerned, but not enough about how weaving works best nor what my personal preferences are to know what kind of fix would be right. (Obviously, choose a stronger yarn for the warp, but how would I find one in just the right color? Would I want warp and weft in different colors? There were just too many variables.) I know confidence and knowledge will come with time, so for now each foray into weaving is another experiment, and blind luck and a hopeful attitude makes up for actual planning. (I could never imagine approaching knitting this way! Egads.)
As I say, my weaving experience is very limited so of course my skills are, well, in need of practice, but I think I did okay. I tried not to beat the weft down too hard (which is my instinct) in order to keep the gauge relatively even in both directions. Truth is, a different-dent reed was probably in order but I only have the one. The edges are not exact but they’re not drastically bad, either! I think dad liked it a lot, and he immediately donned it when we exchanged Christmas presents a few weeks ago. I only wish I’d bought more of this yarn to weave a scarf for myself, too.
So my dear friend Miko is expecting a baby in February, and for her shower I was charged with organizing an activity of some kind, preferably of the not-messy variety. I wasn’t inclined toward fabric paint anyway, because even thought that makes the designs really personal, it also makes them look—let’s be honest here—like crap. While it’s nice, I’m sure, to have a handful of baby garments that feel truly expendable, I figured we could do a little better.
I found some ideas online and followed suit, buying a bunch of onesies (mostly all newborn size; if I were to do this again I’d get more of an assortment of sizes if possible) and also some bibs. A nice long roll of Heat ‘n’ Bond was going to be the key to simple, mess-free decorating. In order to ensure all the designs would match, I bought a charm pack of fabrics (Moda Bluebird Park). I considered bringing scraps from my own stash—and this could be an awesome scrapbuster!—but I’m happier with how it all looks using this matched set. I cut out an assortment of simple shapes (turtle, elephant, ice cream cone, letters, random shapes) in heavy-weight paper for people to use as stencils. I also brought some cookie cutters for tracing.
The process goes like this: Cut the Heat ‘n’ Bond into a manageable square—about the size of a charm square or just the size of the chosen shape. Have a guest pick a stencil and trace the shape onto the paper side of the Heat ‘n’ Bond, reminding them that if it has directionality it needs to be traced backward. Do not let them cut it out yet! Take the square and iron it to the back of their chosen fabric, then have them cut it out of the fabric. They can then peel the paper backing off the shape and arrange it how they want on the onesie/bib (no worries about permanence: it won’t stick until ironed again). Then press it into place! Done! I manned the iron for the most part, but people could certainly do that themselves if the iron were conveniently placed (I was in a corner with a mini board on the floor!).
Everyone really got into it and people had some sweet and creative ideas. The mom-to-be even got in on the action, designing her own martini glass for a bib. I did the “H” on a hedgehog circle (the baby’s last name will begin with H), the ice cream cone, and two jigsaw pieces. I think everyone enjoyed it and the results are super cute! I hope mom gets lots of use out of them and smiles whenever the kiddo spits up on one. (They should last in the wash. I imagine they’ll start to come apart after a few washings, but they’ll have done their job!)
Back in 2012 I declared 2013 the year of sewing clothing. I failed! I sewed 3 garments, all with quilting cotton so they’re not particularly stellar examples of handmade clothing. Even though I didn’t actually accomplish much in this area, I started subscribing to garment sewing blogs by the dozens, learning a lot about construction, fit, and even fabric choices. I started purchasing fabric with garments in mind, and I feel comfortable that 2014 is going to have some clothing!
Here are highlights from the year, and it’s definitely not everything that I made. Several here need blog posts still, a few still need photo shoots! And I have a few knits that I know I photographed but I have searched everywhere and cannot find the shots, so I’ll have to do new photo shoots for those.
I’m excited to report that after a consultation with a hand surgeon (who wrote this awesome book with his wife (affiliate link)) and some exercises with this (the red one), my hands have been in much better shape! If I were actually diligent about doing the exercises I think I could be actually cured by now. Instead it’s taking a bit longer to get back to 100%, but I can knit again! I actually bought a sweater’s quantity of yarn at Rhinebeck so hopefully I’ll feel ready to get started on that soon, plus finish up all the WIPs that have languished while I was on the DL.
So here’s to healthy hands and even more creating with them this year, and for many years to come.
Checking in on my long-in-process cross stitch! I keep forgetting I even have this WIP, so I also keep forgetting to document it. I often take it with me when I travel, especially if I don’t have a good, consuming knitting WIP, but then it stays in my suitcase when I get back. I think I started it more than a year and a half ago! This past week, off and on, I’ve been working on this little house.
It’s definitely slow progress, but I’m totally fine with that. I love the process of cross stitch, and it’s fun to see it start to come together. I admit I wish there were more areas of solid color, rather than, say, the trees, where I have to bounce around all over the place, so I’m vaguely on the hunt for another project that’s more filled in with solid stretches. Here’s a pic of the whole thing as it now stands (I don’t use a hoop because, well, I just never did when I was a kid and I honestly can’t imagine it making a huge difference for me). This is worked on linen and the pattern says to hold two strands; I wish it called for 3 or I could be sure I’d have enough if I did because I hate how not “full” the Xs are.
Hopefully I’ll make more regular progress so there’s something to check in on soon!